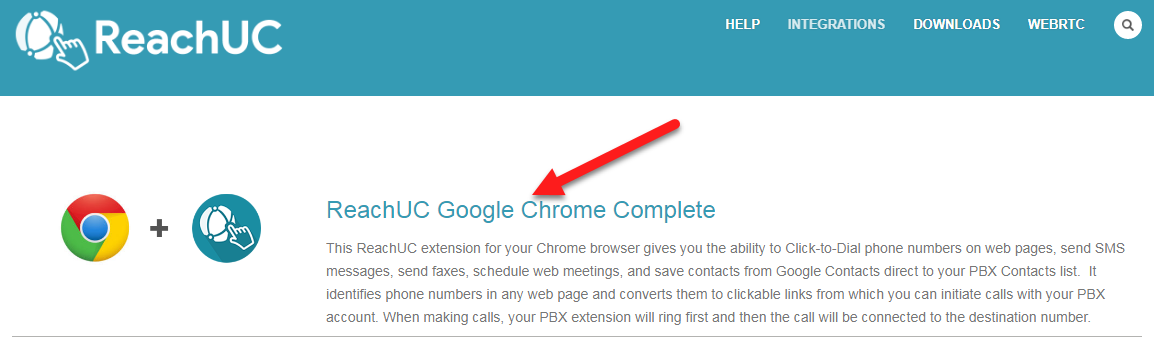
ReachUC Google Chrome Complete
The ReachUC Google Chrome Complete extension allows you to harness the features of your cloud PBX from within the Chrome browser. With ReachUC you can:
- Initiate Click-to-Dial PBX calls or send SMS or send fax message to any phone number on web pages by clicking on the pop-up above the highlighted number.
- Schedule meetings for MeetingManager from the extension and save them to your Google Calendar account.
- Create a meeting in Google Calendar and have it automatically added to your MeetingManager.
- Save contact information from Google Contacts to your PBX Contacts list, and
- Call, send SMS, or send a fax to any phone number or extension from an integrated dialpad.
To enable this feature go to ReachUC – Extensions
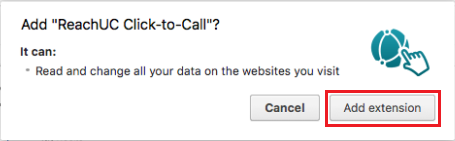
Clicking the name of the extension will direct you to Chrome Web Store.

When prompted, click Add Extension.
After adding the extension ensure that the ReachUC extension is present.
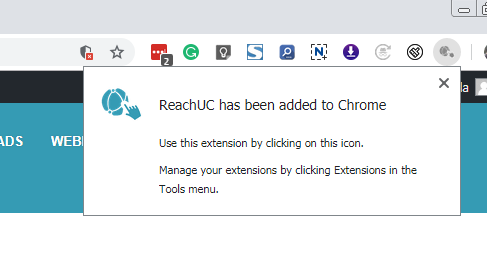
If the extension icon is not showing try clicking on the Extensions icon ![]() (looks like a puzzle piece) near your avatar as it may need permission for access initially.
(looks like a puzzle piece) near your avatar as it may need permission for access initially.
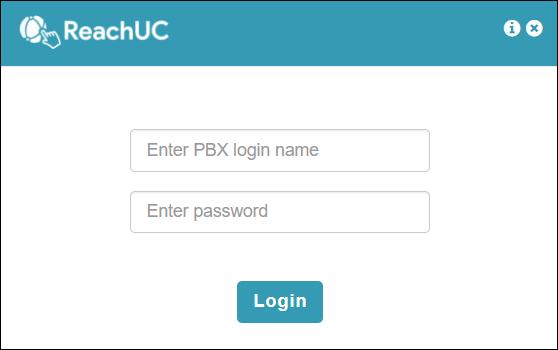
Login to the ReachUC extension using your PBX credentials.
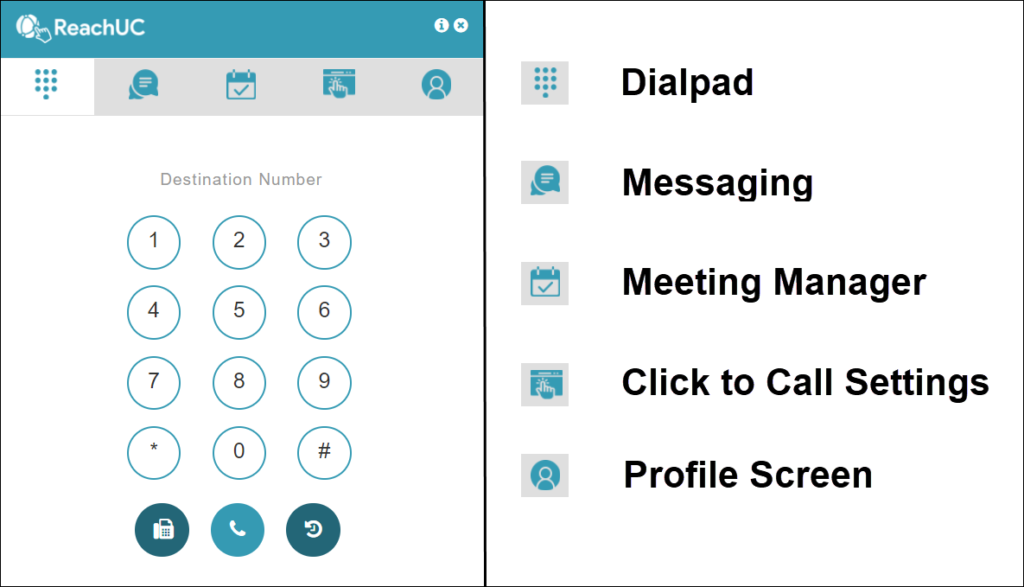
After login, you will go to the Dialpad screen. You can click on a tab icon above it to access the respective features, which are discussed in the following sections.
Note: If faxing or SMS messaging capabilities are not available, contact your phone service provider.
Setting the MFA
Multi-Factor Authentication is an additional feature of the ReachUC Chrome Extension that can be enabled in SkySwitch PBX Portal. To enable MFA please refer to the link below:
ReachUC Chrome Extension MFA Screen
ReachUC accounts with multifactor authentication enabled are now supported. When MFA is enabled on an account, the ReachUC Chrome extension will ask for a security code after submitting the username and password to verify the login. Enter passcode from Google Authenticator App and click “Submit”. Once the passcode is correct the extension will redirect to the landing page which is the Dial page.
The “Back to login” link will allow users to go back to the login page of the ReachUC Chrome Extension.
Dialpad
Here you can use buttons to input a phone number, which you can then call by pressing the Call icon![]() . You can access the faxing feature from the Dialpad screen if you click on the Fax icon
. You can access the faxing feature from the Dialpad screen if you click on the Fax icon![]() .
.

When in the faxing screen, you can choose the Caller ID to use as the sender and the file to be sent. If you are ready to send the fax click on the Send icon![]() or click on the Cancel icon
or click on the Cancel icon![]() to return to the Dialpad screen.
to return to the Dialpad screen.
You can view the last contacted numbers by clicking on the Recent Activities icon![]() . This will show the last 5 phone numbers contacted using the ReachUC Chrome Extension. Fax, SMS, and Call activities done through the extension, including click-to-call options, and hyperlinks are stored in the Last Contacted Numbers page. If there are no recently used phone numbers then the icon will be grayed out.
. This will show the last 5 phone numbers contacted using the ReachUC Chrome Extension. Fax, SMS, and Call activities done through the extension, including click-to-call options, and hyperlinks are stored in the Last Contacted Numbers page. If there are no recently used phone numbers then the icon will be grayed out.
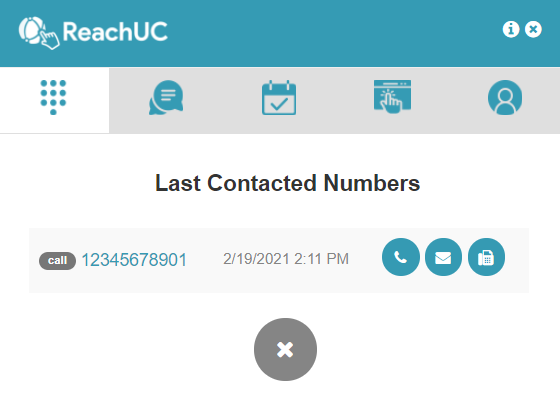
In the Last Contacted Numbers page, each dialed number has action buttons for Call, SMS, and Fax.
Note: The Dialpad can accept shorter phone numbers. For example, if the phone number matches another extension number within your PBX system, it will initiate a call to that extension.
Messaging
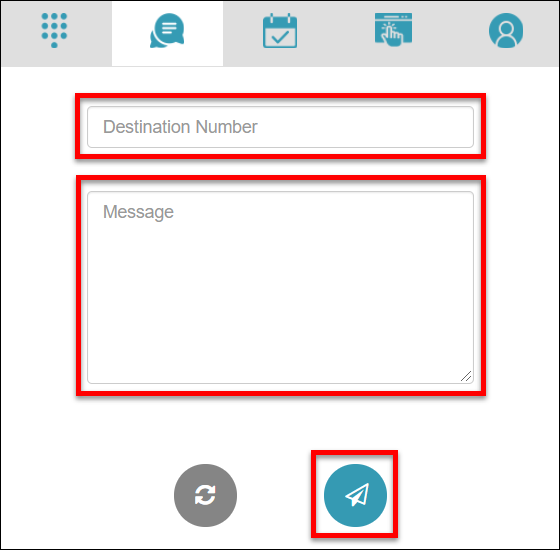
Simply enter the phone number of your intended recipient (include country code like 12055001111) and type in the message you want to send. If you are ready to send your message, then just click on the Send icon![]() . Clicking on the Reset button
. Clicking on the Reset button![]() will erase the current phone number and message entered.
will erase the current phone number and message entered.
Meeting Manager
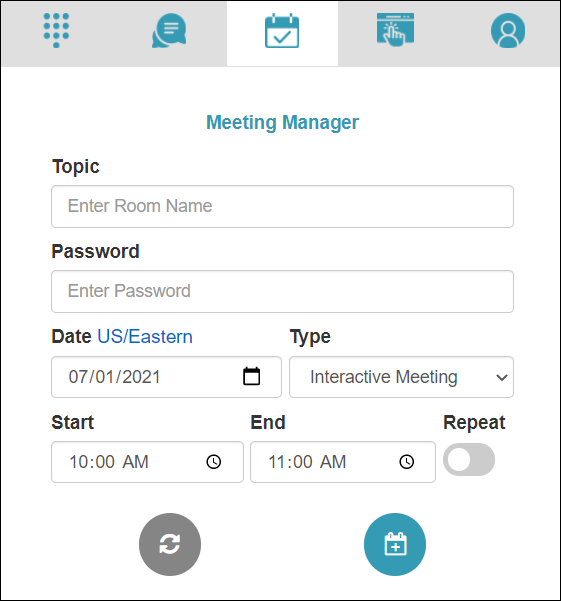
The Meeting Manager settings screen shows the following options for you to be able to set a scheduled meeting:
| Topic | The topic or title of the meeting. |
| Password | The password for entry into the meeting. |
| Date | Choose the date for the meeting. Note: You may change the Timezone for the schedule by clicking on the indicated timezone (e.g. US/Eastern) and selecting the desired timezone. |
| Type | Select the meeting type: Interactive Meeting, HD Video Conference, Webinar, Remote Support, or Remote Access to this Computer. |
| Start | Choose the start time for the meeting. |
| End | Choose the end time for the meeting. |
| Repeat | Toggle for repeating meetings. |
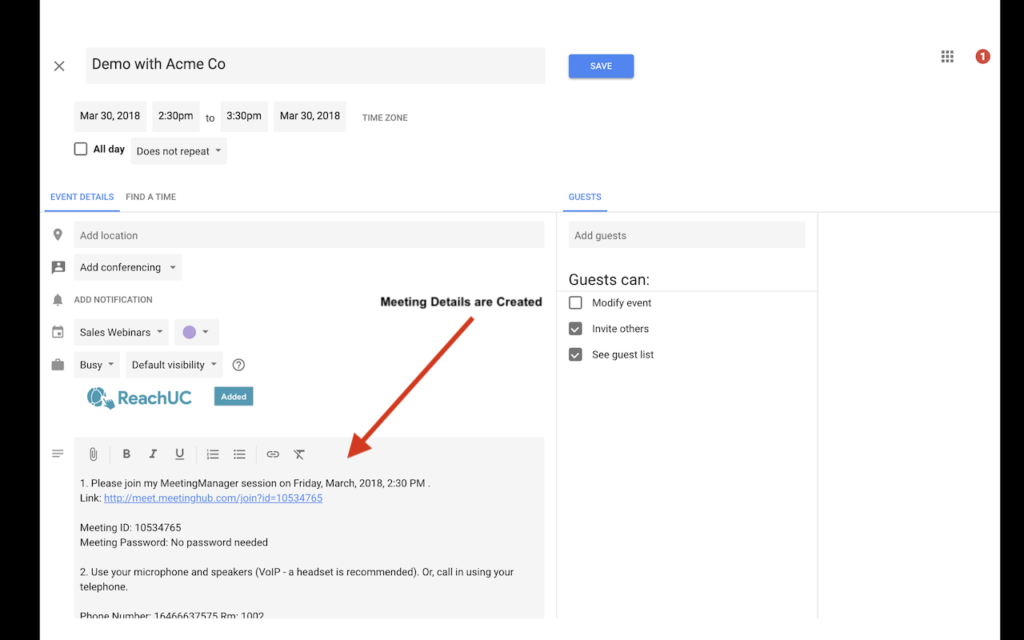
When you are done filling out and choosing the options for your meeting click on the Add Meeting button![]() to save it. Click on the Reset button
to save it. Click on the Reset button![]() to put back all settings to the default entries. Clicking on the Add Meeting button will proceed to show a screen showing the details of the created meeting.
to put back all settings to the default entries. Clicking on the Add Meeting button will proceed to show a screen showing the details of the created meeting.
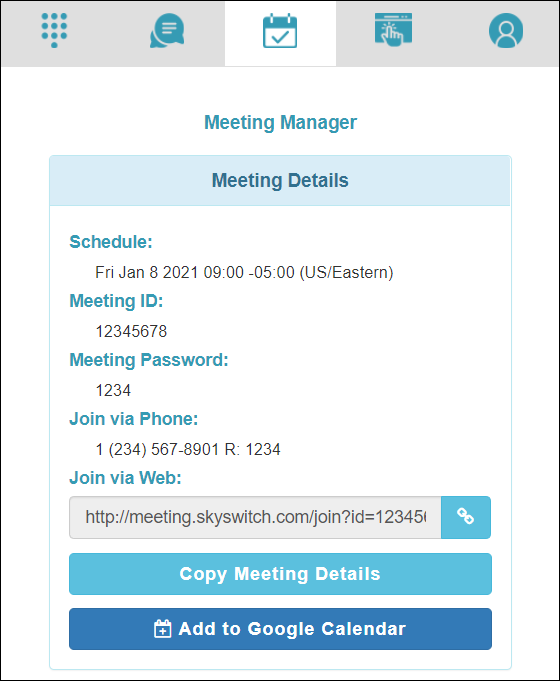
From here you can copy the link to the meeting by clicking on the Copy Link button![]() and then share it with those who will be joining the meeting.
and then share it with those who will be joining the meeting.
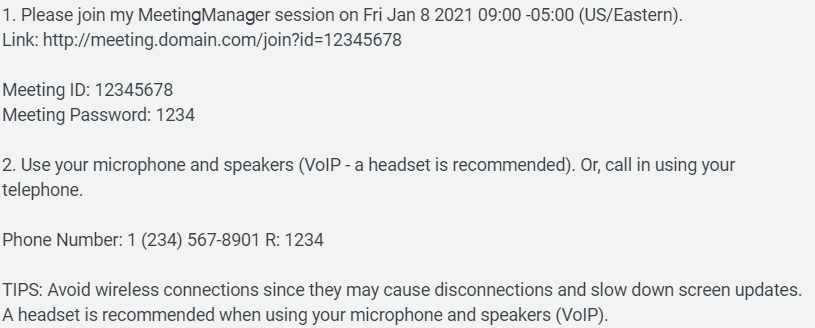
You can also click on the Copy Meeting Details button which will place the meeting’s details into the clipboard. An example of the copied details can be seen in the screenshot below.
You can add the scheduled meeting to Google Calendar by clicking on the Add to Google Calendar button. After clicking on the button you will be asked to give permission to access the calendar of your chosen Google account. Once authentication is completed, you can then choose which Google calendar to add the meeting to. You can finalize the selection by clicking on the Continue button.
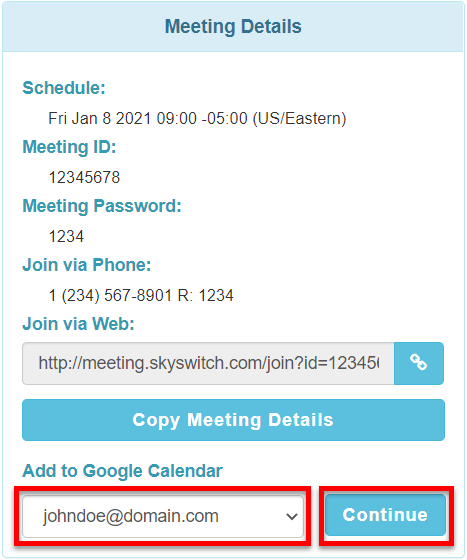
A browser tab will then open in your Chrome showing the Google Calendar event settings. You can check the settings and add guests to the event. When done, click on the Save button to finalize. Note: If this is a recurring meeting be sure to set that it is repeating.
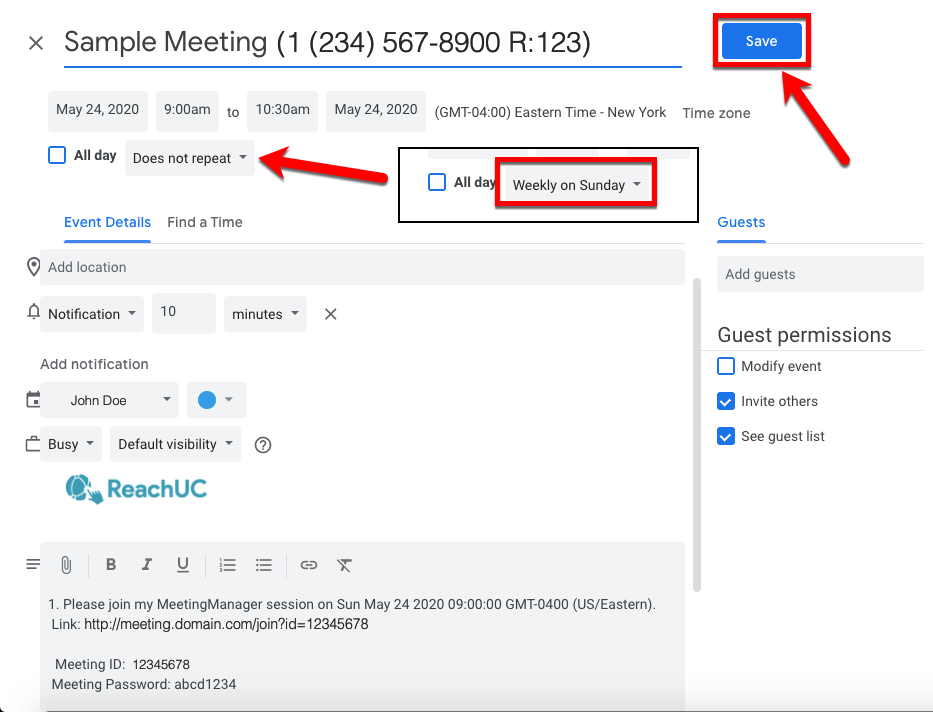
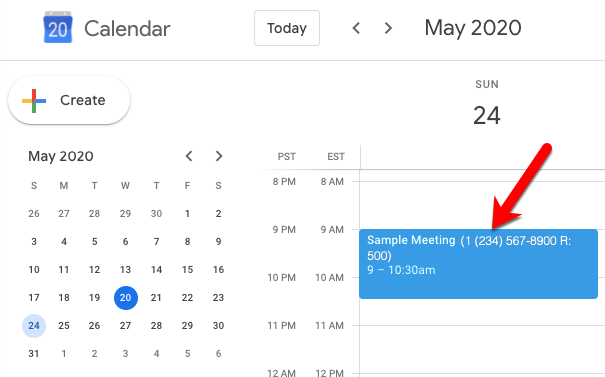
After clicking the Save button it will then show up in your Google Calendar.
An alternative process for creating the meeting is when you create a new Google Calendar event, you will see an option to schedule a Meeting Manager meeting.

Click to Call Settings
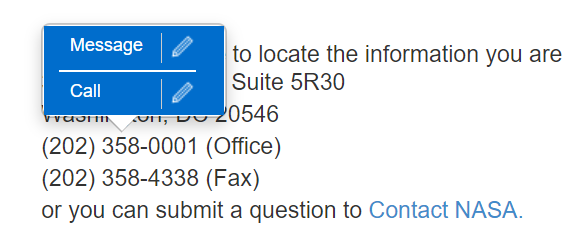
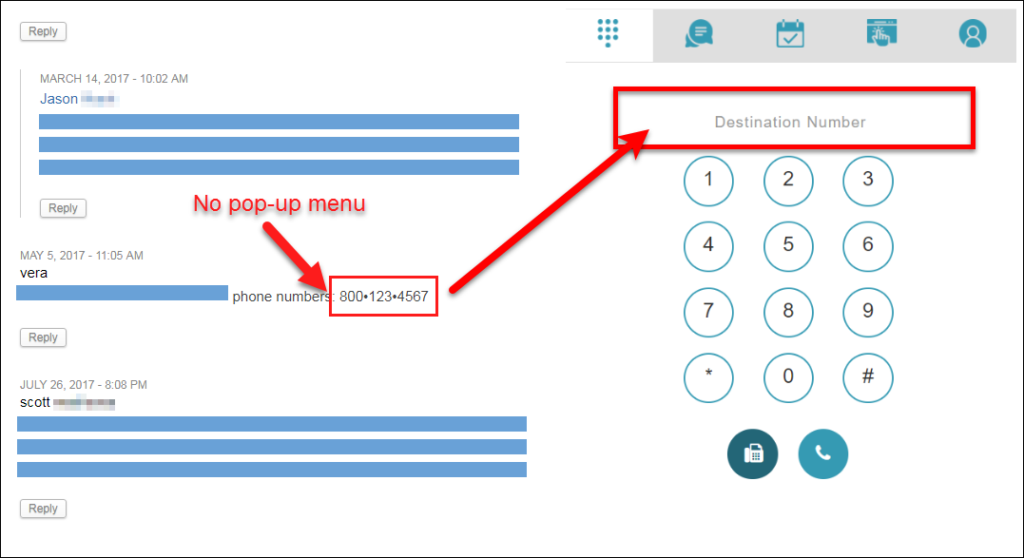
Click to Call provides the ability to click phone numbers found in websites to initiate a call to a phone number on a page. ReachUC Google Chrome Complete Extension provides the click to call functionality by showing a popup menu when you mouse over a phone number. When the Call option is clicked, a call will be initiated between the phone number and your ReachUC softphones and other registered PBX devices.
The popup menu also provides advanced features such as SMS messaging. Note that some advanced features of ReachUC may not be provided by your phone provider. If you wish to have the full set of features, contact your ReachUC phone provider.
The various settings here can tweak your ReachUC Google Chrome Complete Extension to suit your everyday needs. Note that any changes to these settings will only take effect for previously opened web pages when you refresh the pages.
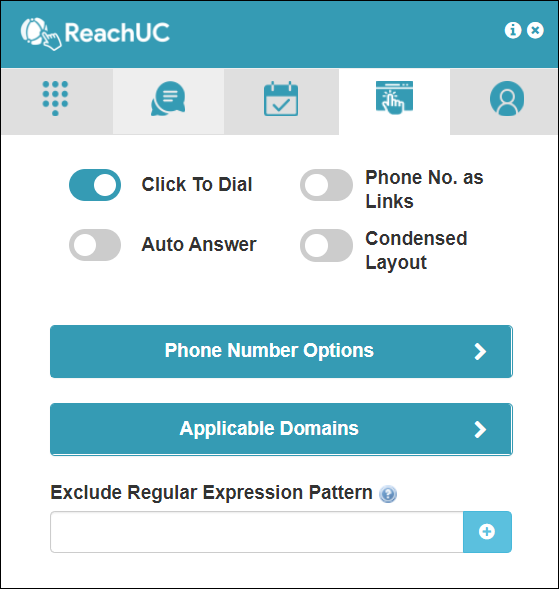
The Click to Call Settings screen shows the following settings:
Click to Dial toggle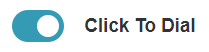
If this toggle button is disabled, the click to dial feature is altogether disabled. When disabled, It implies that you will use the ReachUC Chrome Extension Complete only for scheduling meetings or manual dialing of numbers via the Dialpad.
When enabled, phone numbers in web pages will show a popup menu when you mouse over them. Selecting the Call option will initiate a call to the highlighted number or select the Message option to open a dialog box for sending an SMS to the highlighted number.
Note: If not all options are available for you please contact your service provider for details.
Phone No. as Links toggle
By default, phone numbers in the pages will generate a pop-up menu but you may instead turn them into clickable hyperlinks by enabling the Phone No. as Links toggle.
The hyperlink mode looks like the one in the example below. Clicking the link will initiate the click to call function.
Note: The Condensed Layout toggle will not be available when hyperlink mode is enabled.

Note: The Message option will no longer be available when in hyperlink mode. Note further that not all telephone numbers on the page may become clickable especially if the website already implements showing numbers as hyperlinks.
Auto Answer toggle
By default, click to dial works by calling your ReachUC PBX devices which may be the ReachUC softphone application and your physical VoIP phones. Click to dial will ring all your devices, wait for you to pick up one of the devices, and then call the phone number selected from the web page.
If instead of picking up a ringing device, you may prefer to have one of your physical PBX phones to answer the click to dial call automatically, you can then enable the Auto Answer toggle.
If you have several physical phones, you will have to select which device will Auto Answer.
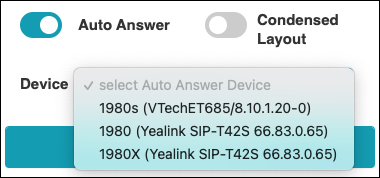
If you only have a single registered physical phone, you will not be asked to select a device naturally.
If you do not have any registered physical phone, you will not be able to enable the Auto Answer toggle button.
Condensed Layout toggle
By default, the click to dial popup is a menu containing full words such as Message and Call.

When in this full layout, clicking the pencil icon will give you the chance to review the number before actually initiating the call.
You can enable Condensed Layout via a toggle button if you want to have a smaller popup that shows only icons representing Message or Call as shown accordingly in the example below.
When in condensed layout, the call will be immediately initiated. You will not have a chance to review and change the phone number to call.

Note that the options available on the popup are governed by the type of services you get from your PBX provider. It is possible that SMS Message may not be available for you and you may need to contact your provider to have the services activated.
The images below show that only the basic Call option is available for you.
This is how a full layout is shown when only the Call option is available.

This is how a condensed layout is shown when only the Call option is available.

Phone Number Options
Clicking on the Phone Number Options button will show the following settings:
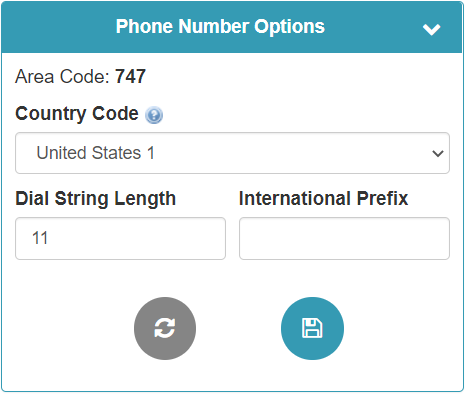
Area Code
When a detected phone number is considered a domestic number but lacking an area code, this is the area code to be added. For example, if the detected number is 9992000, the phone number called is (Country Code)+7479992000.
Country Code
When a detected phone number is considered a domestic number but lacking a country code, this is the country code to be added. For example, if the detected number is 9992000 and the area code is 747, the full phone number called is 17479992000.
Dial String Length
This is the maximum length of a phone number to be considered as a domestic number. Detected phone numbers longer than this value will be considered an international number.
International Prefix
This is the prefix to add when a detected phone number is considered an international number. For example, if the international number is +33140205050 and the International Prefix is 00, the phone number dialed is 0033140205050.
Applicable Domains
Clicking on the Applicable Domains button will show you settings to limit the click to dial feature to only activate on certain domains or to exclude certain domains.
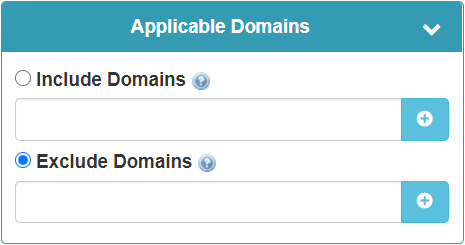
Include Domains
When the Include Domains radio button is on, Click To Dial will only work on the listed domains in the Include list. For example, add *.reachuc.com if you want to include all web pages within the reachuc.com domain.
Exclude Domains
When the Exclude Domains radio button is on, Click To Dial will only work on web pages that are not part of the domains in the Exclude list. For example, if *.reachuc.com is in the Exclude list click to call will work on web pages outside the reachuc.com domain.
Exclude Regular Expression Pattern
To exclude certain patterns from being detected as phone numbers. These patterns should be represented as regular expressions and added by entering the expression in the text box and clicking on the Add button![]() .
.
To know more about regular expressions, refer to this page: https://regexr.com/.
As an example, if you want to exclude words or patterns such as the word “TICKET” which is followed by the pound sign (#) and any number of numeric digits
TICKET#12345678
Which frequently appear in your browser as a clickable number then you can add the pattern
TICKET#\d*
to be excluded then it will not be converted into a clickable number.
To remove a pattern, simply click on the delete/remove icon![]() beside it.
beside it.
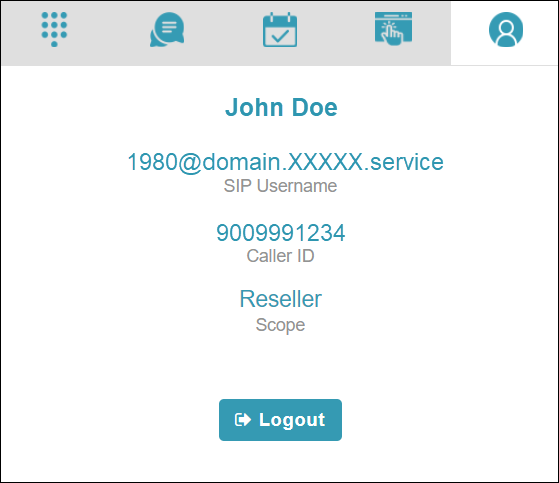
Profile Screen
The Profile Screen shows the logged in user’s information.
Display Call Status Feature
The extension will show a call status badge when a call is made using the extension. Note: There is no indicator to show that a call has been terminated.
![]() – Call… – an orange colored badge to show that a call is in progress using the extension.
– Call… – an orange colored badge to show that a call is in progress using the extension.
![]() – In Call – a red colored badge to show that a call has connected and is currently active using the extension. Note: This will only show during the first 10 seconds of the call, after which the badge will be hidden.
– In Call – a red colored badge to show that a call has connected and is currently active using the extension. Note: This will only show during the first 10 seconds of the call, after which the badge will be hidden.
What to do when a phone number is not detected by ReachUC Chrome Extension
If you encounter a phone number on a page that is not recognized by the extension as a phone number you can highlight and copy the number then paste it into the extension’s dialpad. This will remove any extra characters making the phone number available for a call, message, or fax.
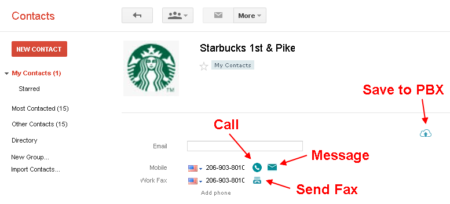
Integration with Google Contacts
Another useful feature of the extension is the ability to Call, Send SMS, Send Fax to the phone numbers when viewing your contacts in Google Contacts and even the ability to save these contacts to your PBX. To do this simply open Google Contacts.

Then open up a contact’s details and choose what you would like to do by clicking on the corresponding icons